Your project may have thousands of existing files of diverse types. As you are planning to move your research into the workspace, understanding how the upload process works can help you plan how to do this most effectively. Consider one of the following approaches:
- The most simple way to upload files is using the workspace web interface. However, if you want to upload data programmatically, you can do so using an API.
- We recommend that you upload no more than 500 files at a time (just as you probably wouldn’t between your desktop and any other shared file server).
- If you have a Virtual Machine add-on to your workspace, using .zip files to batch upload manageable chunks of data is one way to manage this. You will be able to unpack these later in the workspace, and the upload process will be easier.
Upload limits
- Uploads to Files up to 10 GB and to Blobs up to 100 GB have been tested. Larger uploads might also be possible through the API but any network interruption might result in upload failure.
- Generally, files that are larger than 250GB and less than 1TB should be uploaded using the API method with AZ Copy. See a demo video here.
- If AZ Copy fails or for file uploads greater than 1TB, get in touch with support@alzheimersdata.org who will be able to help plan the data migration.
Guidance
See the table below for a summary of different types of source data, guidance on where to store it, and how you can access the data once it has been uploaded into the workspace.
| Source data to be uploaded | File extensions | Typical size per file | Purpose | Workspace folder | Data mapping applied? | Accessed from Web interface | Accessed from Virtual machine |
|---|---|---|---|---|---|---|---|
| Tabular data | .csv | 1000s of rows and columns | Database analysis | Files | Workspace database | Yes | Yes |
| Analysis scripts | .r, .sql | 100 – 500kB | Reproducible statistics | Files | Workspace file system | Yes | Yes |
| Text, pdf documents and small images | .txt, .doc, .pdf, .png, .jpg | 2MB | Project communication and reports | Files | Workspace file system | Yes | Yes |
| Large image files, image series, genomic data, executable files for tool installation, other non-structured data | .png, .jpg, .vcf, .exe | 10GB – 250GB | Raw data for analysis and information extraction | Blobs | Workspace file system | Yes | Yes (needs to be enabled by Service Desk) |
Note:
- The Files folder is intended for storing most of your day-to-day items, such as data analysis scripts, office files, or other documents and data.
- The Blobs folder is meant for holding large items that you access less frequently and is ideal for raw data analysis and information extraction tasks.
Uploading files using the web interface
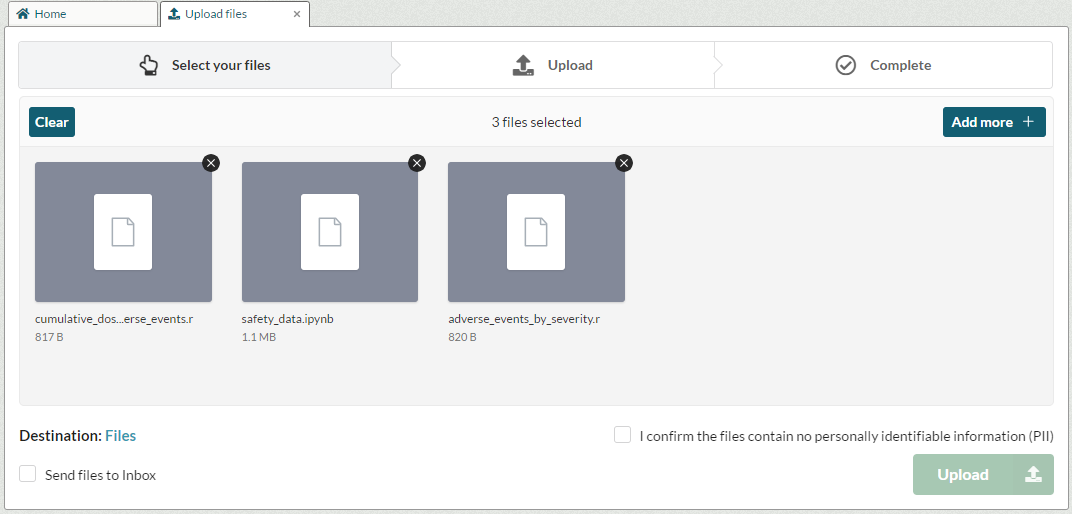
When in the workspace, navigate to the Upload dropdown menu and select Upload files or data. You can either drag and drop your files into the Upload File panel or browse and select the file to upload. You can change the upload destination by using the Destination link at the bottom left of the screen.
Alternatively, you can upload your files to your workspace Inbox where they can then be filed later. Before uploading, check the box to confirm that you are authorised to upload the data then click the ‘Upload’ button and your files will be uploaded into the selected folder.
The progress bar of the upload is shown at the bottom. On upload, all files go through an Inbound Airlock, where they are scanned for malware. Once the files have been uploaded, you can press 'x' to close the upload tab. Now you should be able to find your uploads either in the Files or the Inbox, depending on or the destination you have previously selected.
Uploading files via an API
As well as uploading files via the user interface, it is also possible to do so using an API.
There are a few reasons you may wish to do this. Firstly, you may need to upload files larger than 250GB and less than 1TB. Secondly, API tokens allow people who are not workspace members to upload to the workspace. Thirdly, the use of the API allows users to upload data programmatically. For example, perhaps you have a regular stream of data coming into your study and you want it to be automatically pushed on to your workspace.
Generate an upload token
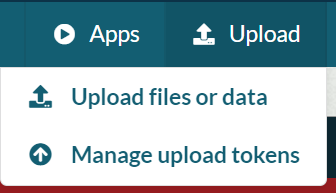
First, go to the Upload dropdown menu and select Manage upload tokens. This will take you to a new tab showing existing tokens and a form to generate new ones.
Provide a reason for the token generation and select the validity period for your new token – the default is set to the maximum (30 days).
If you tick the 'Upload data to database' checkbox, uploaded CSV files and associated metadata will be used to create a database table. If you do not check it, the files will be uploaded to your workspace Inbox.
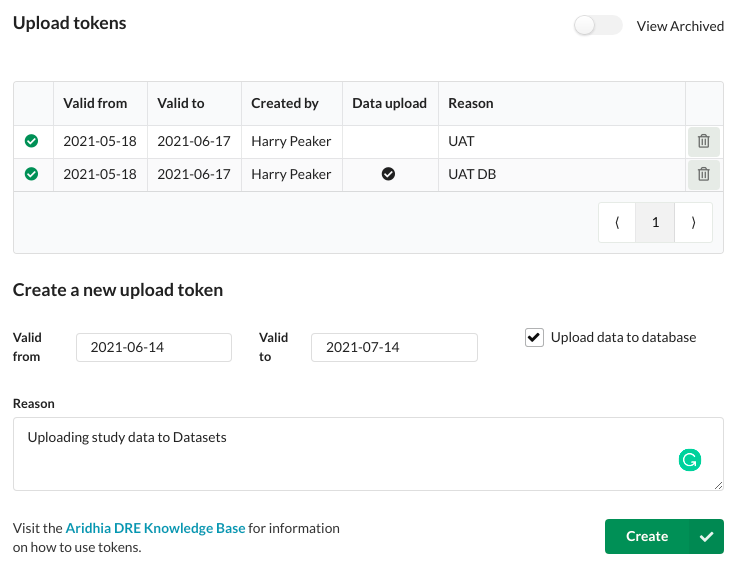
Your new token will be listed as the first entry in the table. Use the Copy button to copy your token to your clipboard.

Be aware that once you close the tab you will not be able to copy the token anymore. Save the copied token if you wish to use it again.
Download AzCopy
To use the API, you will need to download AzCopy to your computer. You can add the AzCopy directory to your path, which allows you to use AzCopy from any directory on your system.
If you choose not to add the AzCopy directory to your path, you'll have to first navigate to the location of your AzCopy executable before using it in the command line.

Upload your files
To run AzCopy on your own machine, if you did not add it to your path, first navigate to the location where you have installed AzCopy and run the following command:
azcopy copy "/path/to/your/file" "token"
If you want to recursively copy data from a local directory, add the --recursive=true flag at the end.
Depending on whether you checked the 'Upload data to database' box, the files uploaded through an API will be found either in the Database tab or in the Inbox.